Tutorial

COLOUR | Christmas Card
  • tool: markers
  • difficulty: medium

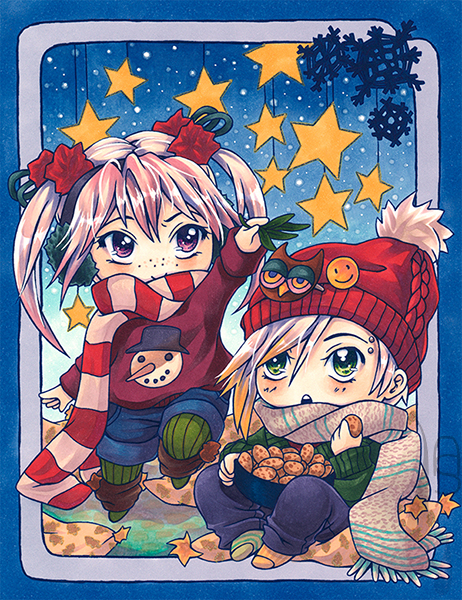
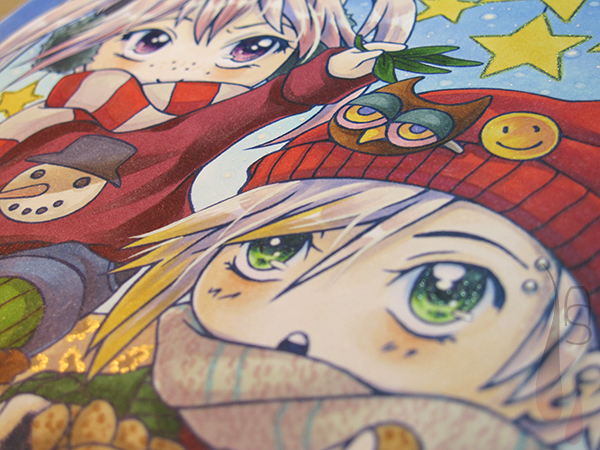
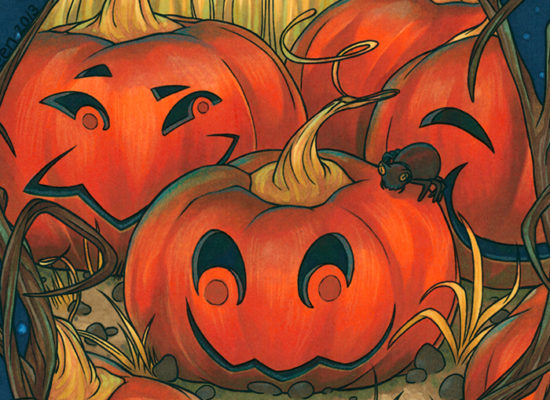
As it is getting closer to Christmas I thought something Christmassy would be nice for my next tutorial. So I tried my hands on what could be a cute motif for the front of a Christmas card. I designed the image with children in mind, which is the reason why I kept the outlines rather simple and the whole image clutter free.

I knew I wanted to work with dark blue outlines instead of black ones, so my computer had to help a bit. I changed the outlines from black to navy and printed them out on slightly thicker paper. The problem with inkjet ink and markers is that the marker tends to smudge the ink no matter how long the ink could dry. There’s a little trick to avoid this: iron the outlines (don’t forget to protect the paper) with medium heat. After that I was good to go with markers.

Step 1

The image itself isn’t very Christmassy-themed except for the mistletoe. The whole atmosphere comes from the colour choice. I decided to give the typical white-red scheme a try. I did start the tutorial with the chibi figures fully coloured, though not her scarf, hair ornaments and his hat. For the flat base colours I used a very light beige, a medium red and moss (for the mistletoe). For the bobble on his hat I left some paper white to shine through.

A tutorial on colouring a Christmas chibi card with markers

 
I then added the shadows on the white parts with a light greyish purple on the scarf. For the bobble I first used the light beige again and then the light greyish purple to give more shape to the fluffy bobble. With a medium purplish taupe I started to define the shadows on the red surfaces (bottom left image). Then I picked a medium purple and went over the shadow areas on the red again in order to give them a hint of purple while slightly darkening them. For the deepest shadows on the red I used a purple a tad darker than the previous one. To darken the ‘white’ on her scarf even more, I chose the same light greyish purple as before (bottom right image).

Step 2

After the chibi figures were completely coloured, it was time for the background. Since the overall amount of details wasn’t as high, I opted for a simpler background as well. A simple blue gradient would do the trick, so I chose a pale aquamarine as the base colour. On top I put a medium greyish blue. After the second layer had dried, I put down phthalo blue with feathered strokes in a vertical fashion and quickly used the medium greyish blue to blend the two colours together. I repeated this for all the sections (top left image). For the ground I used a similar techniques with the colours being light aquamarine, aquamarine and a tad of mint green (top right image).

A tutorial on colouring a Christmas chibi card with markers

 
Once the colour was dry I picked a medium grey purple to draw the shadows on the ground with the brush nib. I then coloured the border with frozen lake and phthalo blue for the outer border (bottom left image). All that was left of the colouring were the cushions and their details. By now the image was mostly sporting cold colours, yet I wanted to bring back some warmth. I chose a yellow beige as the base colour and the medium grey purple for the cushions’ shadows. I coloured the tassels with pineapple crush and added with a beige the pine tree pattern. The ground still looked a bit too cold, so I added some details with an almost skin coloured beige (bottom right image).

Step 3

For the stars I used a slightly desaturated yellow as a flat colour. The last effect I wanted to add was snow falling. To achieve this I picked a blender and pressed its small nib onto the paper until I could see those white dots, which appear due to the colour being pushed away. I repeated this a few times and with ‘snowflakes’ in various sizes. I also used a white gel pen for further tiny snowflakes.

A tutorial on colouring a Christmas chibi card with markers.

 
Since I wanted to spice up the image a bit, I also added a few details with a golden gel pen, such as the pine tree pattern on the cushions and the stars’ border in the back. A little bit of glitter made the eyes of the two chibis sparkly.

A tutorial on colouring a Christmas chibi card with markers

 
I hope you enjoyed this Christmas card tutorial and maybe it gave you a few ideas to try out yourself. Until next time!

 
© Aileen Strauch, first published on the Letraset art blog in 2013